
Introduction
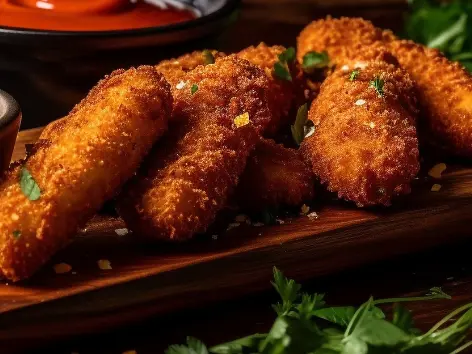
Who doesn’t love a golden, crispy mozzarella stick that delivers pure cheesy perfection with every bite? As Lily Hanna, I’ve spent years perfecting this party favorite, and today, I’m excited to share my secrets for making homemade mozzarella sticks that will transform your snacks into something truly special. Whether you’re hosting game night or simply craving a comforting treat, these easy-to-make bites are sure to impress.
Have you ever wondered how restaurants achieve that perfect balance of crispy coating and gooey melted cheese? The good news is, you don’t need professional equipment to replicate that magic at home. With just a few simple ingredients and some clever tricks, you can elevate your appetizers to the next level. In this recipe, we’ll explore five hacks that make preparing homemade mozzarella sticks easier than ever—no deep-frying skills required!
So grab your apron, let’s dive in, and discover why mastering this recipe is a game-changer for any food lover. By the end, you’ll have a new go-to snack that’s both delicious and customizable. Ready to get started? Let’s do this together!
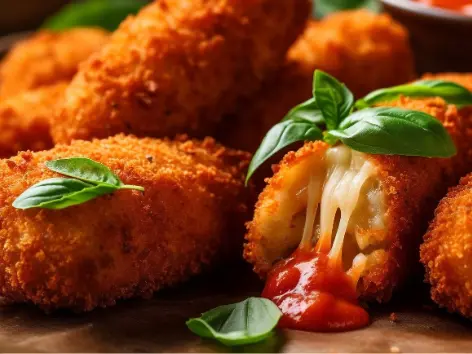
Table of Contents
Ingredients
For perfectly golden and cheesy mozzarella sticks, here’s what you’ll need:
- 1 cup all-purpose flour (for dredging)
- 2 large eggs, lightly beaten
- 1 cup panko breadcrumbs (or regular breadcrumbs for a softer texture)
- 1 teaspoon garlic powder (optional, for added flavor)
- 1 teaspoon dried oregano (optional, for an Italian twist)
- ½ teaspoon salt
- ¼ teaspoon black pepper
- 8 ounces fresh mozzarella cheese, cut into sticks or cubes
- Vegetable oil (for frying, about 2 cups) or preheat your oven to 400°F for baking
Optional Additions:
- Red pepper flakes for heat
- Parmesan cheese mixed into the breadcrumb coating for extra flavor
Step-by-Step Instructions
Let’s break down the process into simple steps so you can create restaurant-quality mozzarella sticks right at home.
- Prepare Your Workstation: Set up three shallow bowls on your counter. In the first bowl, place the flour. In the second, beat the eggs and add a splash of milk for a smoother coating. In the third, combine the panko breadcrumbs, garlic powder, oregano, salt, and pepper.
- Coat the Cheese: Take one piece of mozzarella and roll it in the flour, shaking off any excess. Dip it into the egg mixture, ensuring it’s fully coated. Finally, press it into the breadcrumb mixture until evenly covered. Repeat with all pieces of cheese.
- Chill Before Cooking: Place the coated mozzarella sticks on a plate and refrigerate them for at least 15 minutes. This helps the coating adhere better during cooking.
- Cooking Method – Frying: Heat vegetable oil in a deep skillet over medium-high heat. Once hot (around 350°F), carefully add a few mozzarella sticks at a time without overcrowding the pan. Fry for 2-3 minutes per side, or until golden brown. Remove with a slotted spoon and drain on paper towels. Pro Tip from Lily Hanna: If you’re worried about frying, try baking instead! It’s healthier and still delivers great results.
- Cooking Method – Baking: Preheat your oven to 400°F. Line a baking sheet with parchment paper and spray it lightly with cooking spray. Arrange the coated mozzarella sticks on the sheet, leaving space between each one. Bake for 10-12 minutes, flipping halfway through, until golden and crispy.
- Serve Immediately: These cheesy delights taste best when served hot. Pair them with marinara sauce, ranch dressing, or your favorite dip for maximum enjoyment.
Pro Tips and Variations
Here are some expert tips and variations to take your homemade mozzarella sticks to the next level:
- Double Coating: For an extra crispy exterior, repeat the egg and breadcrumb steps after the initial coating. This creates a thicker layer that holds up well in the fryer or oven.
- Herb Infusion: Mix fresh herbs like parsley or basil into the breadcrumb mixture for a burst of freshness.
- Spicy Twist: Add red pepper flakes or cayenne pepper to the breadcrumb mix for a fiery kick.
- Gluten-Free Option: Use gluten-free breadcrumbs or crushed cornflakes for those with dietary restrictions.
- Baking Hack: Brush the coated sticks with olive oil before baking to enhance crispiness without frying.
Remember, experimentation is key! Don’t be afraid to tweak the recipe to suit your preferences.

Serving Suggestions
Once your mozzarella sticks are ready, it’s time to decide how to serve them. Here are a few ideas from Lily Hanna to inspire you:
- Classic Marinara Sauce: A timeless pairing that complements the rich, cheesy flavor.
- Cool Ranch Dip: Creamy and tangy, this dip adds a refreshing contrast to the warm sticks.
- Garlic Aioli: Elevate the dish with a garlicky aioli for a gourmet touch.
- Buffalo Sauce: Drizzle buffalo sauce over the sticks for a spicy, zesty appetizer.
For parties, arrange the mozzarella sticks on a platter alongside a variety of dips for guests to choose from. You could also skewer them onto toothpicks for easy handling.
FAQs
Here are answers to common questions about making homemade mozzarella sticks:
- Can I freeze leftover mozzarella sticks?
Absolutely! After coating, place the unbaked sticks on a tray and freeze until solid. Transfer them to an airtight container and store in the freezer for up to 3 months. When ready to cook, bake or fry directly from frozen, adding a few extra minutes to the cooking time. - What type of cheese works best?
Fresh mozzarella is ideal because it melts beautifully and has a mild flavor. However, you can experiment with other cheeses like cheddar or provolone for different tastes. - Do I have to fry the sticks?
No, baking is a fantastic alternative. It’s healthier and requires less effort while still delivering satisfying results. - How long can I keep cooked mozzarella sticks?
Cooked sticks should be consumed within 24 hours for optimal taste and texture. Reheating may cause the coating to soften, so it’s best to enjoy them fresh. - Can I use bread crumbs instead of panko?
Yes, though panko provides a crunchier texture. Regular breadcrumbs work well if you prefer a softer coating.
Conclusion
Making homemade mozzarella sticks doesn’t have to be complicated. With the right techniques and a little creativity, you can craft a delicious appetizer that rivals anything you’d find in a restaurant. From choosing the perfect coating to experimenting with flavors, there’s endless room for personalization.
As Lily Hanna, I hope this recipe inspires you to bring more joy and flavor into your kitchen. Remember, cooking is all about having fun and sharing the love. So gather your friends and family, serve up these cheesy delights, and watch the smiles appear. Happy cooking!
If you enjoyed this recipe, feel free to share it with others or leave a comment below. Your feedback means the world to me!